# Consumer credit cards
## Introduction
Integrate Solaris Consumer Credit Cards to issue, activate, and manage cards for your retail customers. This guide covers the end-to-end flow, including automated credit scoring and KYC.
### How does it work?
Customers apply for a credit card through your solution by completing the following:
1. **Compliance:** Fulfill legal requirements.
2. **Data Submission:** Submit mandatory personal and financial data.
3. **Scoring:** Pass the credit scoring process.
4. **Identification:** Complete the KYC flow (e.g., Bankident).
You can offer **Charge** or **Revolving** credit cards. Note that onboarding requirements differ slightly depending on the card type.
This page covers specific integration steps. See the [Credit Cards Overview](/guides/cards/credit-cards) for general product logic.
## System prerequisites
Before starting the onboarding process, implement the following requirements:
### 1. Technical setup
Before starting, ensure your environment is configured for the **Digital Banking** product scope.
* **Authentication:** Retrieve your client credentials and set up your OAuth flow.
* **Webhooks:** Configure your endpoint to receive event notifications (e.g., incoming transfers, status changes).
[View the Technical Setup Guide](/guides/get-started/technical-setup)
### 2. Legal & Compliance screens
You must integrate specific consent screens into your signup flow *before* initiating the API onboarding process.
**Required Screens:**
1. **Terms & Conditions:** Collect explicit consent to Solaris T&Cs.
2. **Customer Information:** verify personal details.
3. **Economic Interest:** Confirm the customer is acting on their own behalf.
4. **Tax Information:** Collect Tax ID (required for Germany).
5. **FATCA/CRS:** Determine US tax liability.
6. **PEP Declaration:** Self-declaration for Politically Exposed Persons (Required for FR, IT, ES).
**Data Storage:**
For every consent screen, you must capture a **UTC timestamp** (e.g., `2023-10-27T10:00:00Z`). These timestamps are mandatory fields when creating the `person` resource.
| Consent Type | API Field (Person Resource) |
| --- | --- |
| Terms & Conditions | `terms_conditions_signed_at` |
| Data Processing | `data_terms_signed_at` |
| Economic Interest | `own_economic_interest_signed_at` |
| FATCA/CRS | `fatca_crs_confirmed_at` |
[View the Legal Screens Guide](/guides/get-started/onboarding-requirements/1-legal-compliance-screens)
### Postbox
Solaris sends all documents related to credit card applications (e.g., contracts and statements) via Postbox. Therefore, implementing the Postbox feature is mandatory before initiating the onboarding process. For instructions, check the [Postbox integration guide](/guides/compliance/postbox).
### B2C SDD mandate
Create a B2C SDD mandate and collect the customer's signature on it to allow Solaris to charge the customer's reference account for credit card repayments each month.
The [SEPA Direct Debit](/guides/digital-banking/sepa-transfers/sepa-direct-debit-transfer/#sdd-mandate) (SDD) mandate is the customer's authorization for Solaris to collect funds from their account in the future. Solaris will pull SDDs from the customer's reference account for credit card repayments each month.
During your sign-up, you need to collect the IBAN of the reference account from the customer. Additionally, you must create a B2C SDD mandate, which the customer must sign.
**How to create the SDD mandate?**
You must generate a unique SDD mandate number. The `mandate_number` must contain
35 characters and the first 6 must be a partner-specific string agreed upon by you and Solaris during the implementation phase. The remaining 29 may only contain
the following: [A-Z], [a-z], [0-9].
Additionally, make sure to display the following information to the customer before they sign the mandate:
- Full name (`First_name` + `last_name`)
- IBAN
- Generated mandate reference
- Name of Payee: Solaris SE
- Legal text containing authorization for the mandate
## Integration overview
* This guide includes the onboarding requirements for both charge and revolving cards for retail customers in Germany. However, some of the steps are only required for revolving credit cards.
* The following integration uses [Bankident](/guides/kyc/bankident) as the identification method. Other KYC methods are also possible. Contact your Partner Manager for more information.
The following diagram gives a high-level overview of the integration process for consumer credit cards.
```mermaid
flowchart TD
%% --- Chart Structure ---
subgraph P1 ["Phase 1: Customer Registration"]
A1("Step 1:
Collect Data &
Create Person") --> A2("Step 2:
Verify Mobile Number")
A2 --> A3("Step 3:
Create Tax Identification")
end
subgraph P2 ["Phase 2: Application"]
A3 --> B1("Step 4:
Create CC Application")
B1 --> B2{Scoring
Check}
B2 -->|Pre-Approved| B3{Card
Type?}
end
subgraph P3 ["Phase 3: Documents & Identification"]
B3 -->|Revolving| C1("Step 5:
Sign SECCI &
Contract (QES)")
B3 -->|Charge| C2("Step 6:
Trigger KYC &
CDD Checks")
C1 --> C2
C2 --> C3{Identification
Successful?}
end
subgraph P4 ["Phase 4: Finalization"]
C3 -->|Yes| D1("Step 7:
Finalize Application")
D1 --> D2("Step 8:
Create Reference Account
& Set Limit")
end
subgraph P5 ["Phase 5: Activation"]
D2 --> E1("Step 9:
Create & Activate Card")
E1 --> E2("Step 10:
Card Servicing")
end
F[Decline / Abort]
%% --- Connections for Failure Cases ---
B2 -->|Declined| F
C3 -->|No| F
%% --- Inline Style Definitions ---
style A1 fill:#f2f2f2,color:#1b2230,stroke:#c8cdd6,stroke-width:2px
style A2 fill:#f2f2f2,color:#1b2230,stroke:#c8cdd6,stroke-width:2px
style A3 fill:#f2f2f2,color:#1b2230,stroke:#c8cdd6,stroke-width:2px
style B1 fill:#f2f2f2,color:#1b2230,stroke:#c8cdd6,stroke-width:2px
style B2 fill:#dedbd3,color:#1b2230,stroke:#5e6a7a,stroke-width:2px
style B3 fill:#dedbd3,color:#1b2230,stroke:#5e6a7a,stroke-width:2px
style C1 fill:#f2f2f2,color:#1b2230,stroke:#c8cdd6,stroke-width:2px
style C2 fill:#f2f2f2,color:#1b2230,stroke:#c8cdd6,stroke-width:2px
style C3 fill:#dedbd3,color:#1b2230,stroke:#5e6a7a,stroke-width:2px
style D1 fill:#f2f2f2,color:#1b2230,stroke:#c8cdd6,stroke-width:2px
style D2 fill:#f2f2f2,color:#1b2230,stroke:#c8cdd6,stroke-width:2px
style E1 fill:#f2f2f2,color:#1b2230,stroke:#c8cdd6,stroke-width:2px
style E2 fill:#f2f2f2,color:#1b2230,stroke:#c8cdd6,stroke-width:2px
style F fill:#ffc2ad,color:#1b2230,stroke:#5d5746,stroke-width:2px
%% --- Clickable Links ---
click A1 "#step-1-collect-customer-data-and-create-person-resource"
click A2 "#step-2-create-and-verify-mobile-number"
click A3 "#step-3-create-customer-tax-identification"
click B1 "#step-4-create-credit-card-application"
click C1 "#step-5-download-and-send-secci-form-and-contract-revolving-only"
click C2 "#step-6-complete-the-customer-identification-and-due-diligence-process"
click D1 "#step-7-finalize-credit-card-application"
click D2 "#step-8-create-reference-account-and-set-credit-card-limit"
click E1 "#step-9-create-and-activate-credit-card"
```
br
You can integrate the Solaris consumer credit card product by completing the 10 steps explained in the following sections.
| Category | Step | Description |
| --- | --- | --- |
| **Customer registration** | [Step 1](#step-1-collect-customer-data-and-create-person-resource) | Collect the mandatory data points and create a person resource for your customer. |
| **Customer registration** | [Step 2](#step-2-create-and-verify-mobile-number) | Create and verify the customer's mobile number. |
| **Customer registration** | [Step 3](#step-3-create-customer-tax-identification) | Collect the customer's tax information and create a tax identification resource. |
| **Credit card application** | [Step 4](#step-4-create-credit-card-application) | Collect the required data and create a credit card application for the customer. In the case of charge cards, you can proceed with Step 6 once the application status reaches `PRE_APPROVED`. |
| **Credit card application** | [Step 5 - Revolving cards only](#step-5-download-and-send-secci-form-and-contract-revolving-only) | Once the application status reaches `PRE_APPROVED`, download the relevant documents (SECCI form and credit card contract) from Postbox, share them with your customer, and collect your customer's confirmation on the documents. |
| **Customer identification** | [Step 6.1](#61-customer-identification) | **6.1.1** Create an [identification resource](#611-create-an-identification) for the customer and specify the identification method. **6.1.2** Redirect the customer to complete the [Bank account validation step](#612-complete-bank-account-validation-step). **6.1.3 - Revolving cards only** Download the [final contract](#613-download-final-contract-revolving-only) and display it to the customer on your app. **Step 6.1.4 - Revolving cards only** Trigger the [QES process](#614-start-qes-process-revolving-only) to get your customer's qualified signature on the credit card contract. For charge cards, the QES step is NOT required. |
| **Customer identification** | [Step 6.2](#62-customer-due-diligence) | Ensure that the customer passes the customer due diligence process before proceeding with the following steps. |
| **Customer identification** | [Step 6.3](#63-screening-for-fatca-indicia) | Ensure that the customer passes the FATCA checks. |
| **Credit card confirmation & reference account** | [Step 7](#step-7-finalize-credit-card-application) | Finalize the credit card application to trigger the account creation. |
| **Credit card confirmation & reference account** | [Step 8](#step-8-create-reference-account-and-set-credit-card-limit) | Create a reference account for the customer and attach the credit limit to the credit card account. |
| **Card creation, activation & servicing** | [Step 9](#step-9-create-and-activate-credit-card) | Create and activate the credit card for the customer. |
| **Card creation, activation & servicing** | [Step 10](#step-10-servicing-credit-cards) | Implement all endpoints related to servicing credit cards. |
### Sequence diagram
The following sequence diagram gives an overview of the integration flow:
Diagram: Consumer credit cards flow
In the following sections, you can find descriptions of these steps and their related endpoints.
### Webhooks
Subscribe to the following webhook events to automate your integration. For implementation details, check the [webhooks documentation](/api-reference/webhooks/).
### Identity and person data
* [`IDENTIFICATION`](/api-reference/onboarding/webhooks/webhook-events/paths/identification/post)
* [`PERSON_CHANGED`](/api-reference/onboarding/webhooks/webhook-events/paths/person_changed/post)
* [`PERSON_DELETED`](/api-reference/onboarding/webhooks/webhook-events/paths/person_deleted/post)
* [`PERSON_MOBILE_NUMBER_CREATED`](/api-reference/onboarding/webhooks/webhook-events/paths/person_mobile_number_created/post)
* [`PERSON_MOBILE_NUMBER_DELETED`](/api-reference/onboarding/webhooks/webhook-events/paths/person_mobile_number_deleted/post)
* [`PERSON_TAX_IDENTIFICATION_CHANGED`](/api-reference/onboarding/webhooks/webhook-events/paths/person_tax_identification_changed/post)
### Accounts and bookings
* [`BOOKING`](/api-reference/onboarding/webhooks/webhook-events/paths/booking/post)
* [`ACCOUNT_BLOCK`](/api-reference/onboarding/webhooks/webhook-events/paths/account_block/post)
* [`ACCOUNT_CLOSURE`](/api-reference/onboarding/webhooks/webhook-events/paths/account_closure/post)
* [`ACCOUNT_CLOSURE_REQUEST`](/api-reference/onboarding/webhooks/webhook-events/paths/account_closure/post)
* [`POTENTIAL_ACCOUNT_BLOCKING`](/api-reference/onboarding/webhooks/webhook-events/paths/potential_account_blocking/post)
* [`POSTBOX_ITEM_CREATED`](/api-reference/onboarding/webhooks/webhook-events/paths/postbox_item_created/post)
### Cards
* [`CARD_LIFECYCLE_EVENT`](/api-reference/onboarding/webhooks/webhook-events/paths/card_lifecycle_event/post)
* [`CARD_AUTHORIZATION`](/api-reference/onboarding/webhooks/webhook-events/paths/card_authorization/post)
* [`CARD_AUTHORIZATION_DECLINE_V2`](/api-reference/onboarding/webhooks/webhook-events/paths/card_authorization_decline_v2/post)
* [`CARD_AUTHORIZATION_RESOLUTION`](/api-reference/onboarding/webhooks/webhook-events/paths/card_authorization_resolved/post)
* [`CARD_FRAUD_CASE_PENDING`](/api-reference/onboarding/webhooks/webhook-events/paths/card_fraud_case_pending/post)
* [`CARD_FRAUD_CASE_TIMEOUT`](/api-reference/onboarding/webhooks/webhook-events/paths/card_fraud_case_timeout/post)
### Compliance and seizures
* [`PERSON_SEIZURE_CREATED`](/api-reference/onboarding/webhooks/webhook-events/paths/person_seizure_created/post)
* [`PERSON_SEIZURE_DELETED`](/api-reference/onboarding/webhooks/webhook-events/paths/person_seizure_deleted/post)
* [`PERSON_SEIZURE_FULFILLED`](/api-reference/onboarding/webhooks/webhook-events/paths/person_seizure_fulfilled/post)
* [`PERSON_SEIZURE_UPDATED`](/api-reference/onboarding/webhooks/webhook-events/paths/person_seizure_updated/post)
### Authentication
* [`SCA_CHALLENGE`](/api-reference/onboarding/webhooks/webhook-events/paths/sca_challenge/post)
* [CREDIT_CARD_APPLICATION](/api-reference/onboarding/webhooks/webhook-events/paths/credit_card_application/post)
### Mandatory features
You must integrate all the mandatory features for Digital Banking & Cards highlighted in the [Onboarding requirements guide](/guides/get-started/onboarding-requirements/6-mandatory-features) before going live with your solution **except for** Account Closure. Credit cards have their own termination process, which is [described below](#step-11-terminating-credit-cards).
## Step 1: Collect customer data and create person resource
In this step, collect the mandatory data points from the customer in your sign-up flow, including all the timestamps of the customer's consent to the [legal and compliance screens](#system-prerequisites).
Afterward, pass all the data points to Solaris by creating a [person resource](/guides/get-started/onboarding-requirements/2-data-collection) to represent your customer.
**API reference**
For a complete list of endpoints, properties, and examples related to the `person` resource, visit the following links:
- [Person resource API reference](/api-reference/onboarding/persons/#tag/Persons)
- [POST Create person](/api-reference/onboarding/persons/#tag/Persons/paths/~1v1~1persons/post)
- [GET Retrieve a person](/api-reference/onboarding/persons/#tag/Persons/paths/~1v1~1persons~1%7Bid%7D/get)
- [PATCH Update person](/api-reference/onboarding/persons/#tag/Persons/paths/~1v1~1persons~1%7Bid%7D/patch)
**Related webhook events**
- [`PERSON_CHANGED`](/api-reference/onboarding/webhooks/webhook-events/paths/person_changed/post)
- [`PERSON_DELETED`](/api-reference/onboarding/webhooks/webhook-events/paths/person_deleted/post)
Important points about data collection
- Review the special requirements in the [Onboarding requirements guide](/guides/get-started/onboarding-requirements/2-data-collection/#important-considerations-for-data-collection).
- Submit information exactly as it appears in official documents.
- **Sandbox Testing:** Ensure that each person you create has unique values for `first_name`, `last_name`, `birth_city`, and `birth_date`. If you create over 1000 identical person resources, the API will return a `400` error.
- **Privacy:** Do not use real personal data when testing in Sandbox.
#### POST Create person
Important points
- The mandatory data points required for retail customers may differ depending on the country in which you're opening the account. The following example outlines the mandatory fields for Germany. For information about other countries, please refer to the [Onboarding requirements guide](/guides/get-started/onboarding-requirements/2-data-collection/#retail-customers-b2c)
Call this endpoint to create a person resource for your customer, and add the following mandatory data points in the request body:
**Mandatory data points for retail customers in Germany**
- `salutation`
- `first_name`
- `last_name`
- `address`
- `line_1`
- `line_2`
- `postal_code`
- `city`
- `country`
- `mobile_number`: This field is only used to pass the mobile number to our KYC provider IDnow for the Videoident KYC flow. To create and verify a mobile number for your customer, you need to use the dedicated [mobile number endpoints](https://docs.solarisgroup.com/api-reference/onboarding/persons/#tag/Person-mobile-numbers).
- `birth_date`
- `birth_city` (must be a valid city)
- `birth_country`
- `nationality`
- `employment_status`
- `fatca_relevant`
- `fatca_crs_confirmed_at`
- `terms_conditions_signed_at`
- `data_terms_signed_at`
- `own_economic_interest_signed_at`
- `tax_information`
- `marital_status`
**Request URL**
```shell
POST /v1/persons
```
[Click here to view the full API reference.](/api-reference/onboarding/persons/#tag/Persons/paths/~1v1~1persons/post)
#### PATCH update person
This endpoint updates one or more properties on a `person` resource. You can only update the following properties using this endpoint:
- `title`
- `salutation`
- `address` (`line_1`, `line_2`, `postal_code`, `city`, `state`, `country`)
- `contact_address` (`line_1`, `line_2`, `postal_code`, `city`, `state`, `country`)
- `employment_status`
- `job_title`
- `email`
- `tax_information` (`tax_assessment`, `marital_status`)
- `fatca_relevant`
- `fatca_crs_confirmed_at`
- `business_purpose`
- `industry`
- `industry_key`
- `own_economic_interest_signed_at`
- `aml_confirmed_on` (only with today or tomorrow's date)
- `expected_monthly_revenue_cents`
- `vat_number`
- `website_social_media`
- `business_trading_name`
- `nace_code`
- `business_address_line_1`
- `business_address_line_2`
- `business_postal_code`
- `business_city`
- `business_country`
- `annual_income_range`
- `data_terms_signed_at`
- `branch`
- `birth_province`
- `birth_post_code`
- `socioprofessional_category`
- `purpose_of_account_opening`
- `main_income_source`
- `work_country`
- `work_province`
- `self_declared_as_pep`
- `international_operativity_expectation`
- `registration_number`
Important
**Restricted Updates:**
* Fields not mentioned in this list can only be updated via Customer Support.
**Freelancer & Self-Employed Requirements (B2C):**
* If a customer changes their `employment_status` to `FREELANCER` or `SELF_EMPLOYED`, you must include **one** of the following in the request to avoid an error:
1. The customer's `nace_code` (Recommended for data quality).
2. Set `industry` and `industry_key` to `null`.
**Request URL**
```shell
PATCH /v1/persons/{id}
```
**Request example**
* [API Reference: Update person](/api-reference/onboarding/persons/#tag/Persons/paths/~1v1~1persons~1%7Bid%7D/patch)
## Step 2: Create and verify mobile number
In this step, collect the customer's mobile number in your sign-up flow and then create a mobile number resource and verify it by sending an SMS OTP to the customer's mobile number. Afterward, the customer enters the received OTP in your frontend to verify their number.
### Mobile number resource
Creating and verifying a mobile number for your customer is a crucial step in the customer onboarding process. With a verified mobile number, customers can use SMS OTPs to complete two-factor authentication (2FA) challenges, which is a requirement for Strong Customer Authentication (SCA).
Info
In some use cases (e.g., stand-alone integrations), the mobile number is verified during the identification process.
### API reference
Visit the following link to find all the endpoints related to the mobile number resource, including related properties and examples.
- [Mobile number resource API reference](/api-reference/onboarding/persons/#tag/Person-mobile-numbers)
**Related webhook events**
- [PERSON_MOBILE_NUMBER_CREATED](/api-reference/onboarding/webhooks/webhook-events/paths/person_mobile_number_created/post)
- [PERSON_MOBILE_NUMBER_DELETED](/api-reference/onboarding/webhooks/webhook-events/paths/person_mobile_number_deleted/post)
Testing static values
To test the following endpoints on Sandbox, you can use the following static values:
- Mobile number: `+15550101`
- SMS OTP: `212212`
#### POST Create mobile number
Collect the customer's mobile number and pass it to Solaris using the following API call. You must include the customer's `person_id` in the request URL.
**Request URL**
```shell
POST /v1/persons/{person_id}/mobile_number
```
**Request example**
```json
{
"number": "+15550101"
}
```
**Response example**
The API returns a `mobile_number` resource with a unique `id` and attaches it to the `person` resource.
```json
{
"id": "91e4d939d781b8eb30d1ee86809761c2cmno",
"number": "+15550101",
"verified": false
}
```
[Click here to view the full API reference.](/api-reference/onboarding/persons/#tag/Person-mobile-numbers/paths/~1v1~1persons~1%7Bperson_id%7D~1mobile_number/post)
#### POST Authorize mobile number
Use the following endpoint to verify the ownership of the provided mobile phone number. The endpoint initiates a one-time-password (OTP) flow: Solaris sends a six-digit OTP to the customer's number, and then they must enter it in your UI.
**Request URL**
```shell
POST /v1/persons/{person_id}/mobile_number/authorize
```
**Request example**
```json
{
"number": "+15550101"
}
```
**Response example**
```json
{
"id": "91e4d939d781b8eb30d1ee86809761c2cmno",
"number": "+15550101",
"verified": false
}
```
[Click here to view the full API reference.](/api-reference/onboarding/persons/#tag/Person-mobile-numbers/paths/~1v1~1persons~1%7Bperson_id%7D~1mobile_number~1authorize/post).
#### POST Confirm mobile number
Use this endpoint to submit the SMS OTP the customer received on their mobile number to finalize the mobile number authorization process. You must add the customer's `number` and `token` (i.e., the SMS OTP) in the request body. Afterward, the mobile number will be `verified` and can be used in the context of Strong Customer Authentication (SCA).
**Request URL**
```shell
POST /v1/persons/{person_id}/mobile_number/confirm
```
**Request example**
```json
{
"number": "+15550101",
"token": "212212"
}
```
**Response example**
```json
{
"id": "91e4d939d781b8eb30d1ee86809761c2cmno",
"number": "+15550101",
"verified": true
}
```
[Click here to view the full API reference.](/api-reference/onboarding/persons/#tag/Person-mobile-numbers/paths/~1v1~1persons~1%7Bperson_id%7D~1mobile_number~1confirm/post)
For more information about how to manage mobile numbers (e.g., changing or deleting a number), check the related [mobile number management guide](/guides/digital-banking/mobile-number-management).
## Step 3: Create customer tax identification
In this step, collect the relevant [tax information](/guides/get-started/onboarding-requirements/3-tax-information) from the customer and create a tax identification resource for them.
### API reference
Important points about tax information
Submitting the tax information of your customers is a requirement to open a bank account in all of Solaris branches. However, note the following:
* You can open the bank account for customers in Germany (DE branch) before they provide tax information. However, you must submit the customer's tax information to Solaris within **90 days** of opening the account. Otherwise, Solaris will block the customer's account with the reason `MISSING_TAX_INFORMATION` until you submit the required tax information.
* If a customer has multiple tax residencies (i.e., taxable in multiple countries), you must create a separate tax identification resource for each tax residency and specify **only** one of them as `primary`.
* The first `tax_identification` to be submitted for a `person` or a `business` must be the primary tax identification. If another `tax_identification` with the value of `primary` set to `true` is created, it will set the `primary` value of the previously created `tax_identification` to `false`.
* A `person` or `business` may only have one `tax_identification` per `country`.
* When creating a `tax_identification`, explicitly collect the `country` value from the user and do not default to their physical residence (i.e., the `country` property of the `person` resource).
* Check the [Onboarding requirements guide](/guides/get-started/onboarding-requirements/3-tax-information#tax-identification-number-tin-per-country) for more information about the TIN requirements per country.
For a complete list of endpoints, properties, and examples related to the `person tax identification` resource, visit the following links:
- [Person tax identifications API reference](/api-reference/onboarding/persons/#tag/Person-tax-identifications):
- [POST Create person tax identification](/api-reference/onboarding/persons/#tag/Person-tax-identifications/paths/~1v1~1persons~1%7Bperson_id%7D~1tax_identifications/post)
- [GET Retrieve person tax identification ](/api-reference/onboarding/persons/#tag/Person-tax-identifications/paths/~1v1~1persons~1%7Bperson_id%7D~1tax_identifications~1%7Bid%7D/get)
- [PATCH Update person tax identification ](/api-reference/onboarding/persons/#tag/Person-tax-identifications/paths/~1v1~1persons~1%7Bperson_id%7D~1tax_identifications~1%7Bid%7D/patch)
**Related webhook events**
- [PERSON_TAX_IDENTIFICATION_CHANGED](/api-reference/onboarding/webhooks/webhook-events/paths/person_tax_identification_changed/post)
#### POST Create person tax identification
Call this endpoint to create a person tax identification for the customer with the `person_id` specified in the request URL. Collect the following tax information from your customers and pass them to Solaris in the request body:
- `number`
- `country`
- `primary`
If the customer has not submitted their TIN to your solution yet (i.e., the value of `number` is `null`), then include the following properties in the request:
- `reason_no_tin`: Possible values are `NOT_ASSIGNED_YET`, `NOT_ASSIGNED_BY_COUNTRY`, `OTHER`.
- `reason_description`: Applies only if the `reason_no_tin` is `OTHER`.
- `tax_id_type`: (Only for Spain) Possible values are `NIE` and `NIF`.
**Request example:**
```shell
POST /v1/persons/{person_id}/tax_identifications
```
[Click here to view the full API reference.](/api-reference/onboarding/persons/#tag/Person-tax-identifications/paths/~1v1~1persons~1%7Bperson_id%7D~1tax_identifications/post)
### Tax ID testing data
You can use the following test values for the TIN to test these endpoints on Sandbox:
| Country | TIN testing values |
| --- | --- |
| DE | 48954371207 |
| FR | 3023217600053 |
| IT | SSSNNN31B28X000C |
| ES | Test data can be generated from this [website](https://testingdatagenerator.com/doi.html) |
## Step 4: Create credit card application
In this step, collect additional information from your customer related to the credit card application and pass it to Solaris using the following endpoint.
### POST Create credit card application for a retail customer
This endpoint creates a credit card application and assigns it to the person with the `person_id` specified in the request URL. The application includes all the required information about the customer, such as their self-declared financial information, credit card type, and requested limit, which Solaris' credit scorer uses to initiate a series of credit checks.
The following fields are just an indication. Solaris will share the mandatory fields based on your banking use case.
**Mandatory fields**
Add the following mandatory properties in the request body:
* `product_type`: Credit card type. For retail, choose `CONSUMER_CREDIT_CARD`.
* `repayment_options`: An object containing the repayment options of the credit card.
* `upcoming_type`: The type of credit card (e.g., revolving or charge card). Options are `FULL` or `PARTIAL`.
* `minimum_amount`: Minimum amount of the used limit to be repaid at the end of each billing cycle. Only relevant in case `upcoming_type` is set to `PARTIAL`.
* `minimum_percentage`: Minimum percentage of the used limit to be repaid at the end of each billing cycle. Only relevant in case `upcoming_type` is set to `PARTIAL`.
* `scoring_options`: An object containing different fields relevant for the credit scoring process:
* `customer_desired_limit`: The credit card limit requested by the customer, subject to the scorer's decision.
* `number_of_dependents`: The number of dependents (e.g., children or spouse) who depend on the customer's income.
* `marital_status`
* `net_income`: The customer's net income amount in EUR after tax deduction.
* `living_situation`: The customer's living situation. Possible values are `LIVING_WITH_PARENTS`, `LIVING_IN_RENTED_HOUSE`, or `LIVING_IN_OWN_HOUSE`.
* `living_situation_expenses`: The customer's living monthly expenses (e.g., rent or mortgage, utilities, health insurance, etc.)
* `existing_credit_repayment_excluding_mortgage`: A field containing information about the customer's existing debt repayments (in EUR) (excluding mortgage payments).
* `other_credit_credit_limit`: If the customer has existing credit cards, include the granted limit in this field.
* `employment_since`: The date when the customer started their current employment.
**Request example**
```json
// POST /v1/persons/{person_id}/credit_card_applications
{
"product_type": "CONSUMER_CREDIT_CARD",
"repayment_options": {
"upcoming_type": "PARTIAL",
"upcoming_billing_cycle": "MONTHLY",
"minimum_amount": {
"value": 200,
"unit": "cents",
"currency": "EUR"
},
"minimum_percentage": 10
},
"scoring_options": {
"customer_desired_limit": {
"value": 5000,
"unit": "cents",
"currency": "EUR"
},
"number_of_dependents": 0,
"marital_status": "MARRIED",
"living_situation": "LIVING_IN_RENTED_HOUSE",
"living_situation_expenses": {
"value": 2000,
"unit": "cents",
"currency": "EUR"
},
"net_income_amount": {
"value": 4000,
"unit": "cents",
"currency": "EUR"
},
"credit_repayment_excluding_mortgage_amount": {
"value": 300,
"unit": "cents",
"currency": "EUR"
},
"other_credit_card_limit": {
"value": 300,
"unit": "cents",
"currency": "EUR"
},
"employment_since": "2019-08-24"
}
}
```
**Response example**
The API call returns an object with a unique id (the `application_id`), including the application `status` (initially set to `PENDING`) and the remaining attributes, which will be populated during the application lifecycle.
Additionally, the call automatically triggers Solaris' credit scoring system, which scores the application and provides its decision on the credit card application, including the limit.
[View full API reference](/api-reference/digital-banking/credit-cards/#tag/Credit-cards/paths/~1v1~1persons~1%7Bperson_id%7D~1credit_card_applications/post)
### GET Retrieve credit card application
This endpoint returns the current status and details of an existing credit card application. For a list of possible values of the application status and their descriptions, check the appendix.
Additionally, subscribe to the webhook event `CREDIT_CARD_APPLICATION` to receive status updates on the application.
**Request URL**
```shell
GET /v1/credit_card_applications/{id}
```
[Click here to view the full API reference.](/api-reference/digital-banking/credit-cards/#tag/Credit-cards/paths/~1v1~1credit_card_applications~1%7Bid%7D/get)
### Application status flow
The following diagram shows the different statuses and transitions for a credit card application:
Diagram: Credit card application status
## Step 5: Download and send SECCI form and contract (Revolving only)
Before triggering the customer identification flow (KYC), you must download the relevant contracts, which the customer must approve. These documents include the following:
* SECCI form
* Credit card contract
The Standard European Consumer Credit Information (SECCI) form is a standardized credit form that includes the information related to a credit offer, such as creditor details, type of credit, amount, terms and conditions, etc.
In compliance with regulatory requirements, you must first send the customer the SECCI form to review and approve. Afterward, you can send them the final contract they must sign during the identification and e-signing process.
In this step, you must do the following:
1. Listen to the webhook event `POSTBOX_ITEM_CREATED`. Once Solaris generates the relevant documents, this webhook will be triggered with the `item_id` for each document.
2. Once you receive a notification from the webhook, download the relevant documents using **GET Download a postbox item**.
3. Display the documents to the customer on your app and collect the customer's consent as a UTC timestamp.
4. Create a confirmation for the customer's confirmation of the documents using **POST Create a confirmation for a Postbox item**.
### 1. POSTBOX_ITEM_CREATED webhook
Once the credit card application reaches the status `PRE_APPROVED`, Solaris will generate the SECCI form and the credit card contract and upload them to your postbox. You'll be notified via the webhook event `POSTBOX_ITEM_CREATED`.
[View POSTBOX_ITEM_CREATED webhook reference](/api-reference/onboarding/webhooks/webhook-events/paths/postbox_item_created/post)
**Payload example**
The payload will include the `id` (i.e., `item_id`) and information about the document, such as `document_type`, size, date, content type, etc.
The documents relevant to the credit card application will have the following document types:
* SECCI form = `CREDIT_CARD_SECCI`
* Credit card contract = `CREDIT_CARD_CONTRACT`
```json
{
"id": "d347d967ae8c4d58b93e6698b386cae9pbxi",
"belongs_to": "3e0b990bb0f49eb1a43904e78461c0cbcper",
"owner_type": "Person",
"created_at": "2022-01-04T13:45:05Z",
"document_date": "2022-06-30",
"document_type": "CREDIT_CARD_SECCI",
"name": "Credit card SECCI form",
"description": "Description",
"customer_notification": true,
"customer_confirmation": true,
"document_size": 1667317,
"document_content_type": "application/pdf"
}
```
### 2. GET Download a document for a Postbox item
Download the documents by adding the `item_id` returned in the webhook payload in the request URL of the following endpoint:
```shell
GET /v1/postbox/items/{item_id}/document
```
[View full API reference](/api-reference/onboarding/compliance/#operation/solaris_postbox_item_document_find)
### 3. Display documents and collect customer's consent
After downloading the relevant documents, you must display these documents to the customer on your app and collect their consent.
### 4. POST Create a confirmation for a Postbox item
After the customer approves the documents on your app, you must create a confirmation using the following endpoint:
**Request example**
```json
// POST /v1/postbox/items/{item_id}/confirmations
{
"person_id": "28a2197ff6e04a05b6316f83a38ccper",
"idempotency_key": "ca3a40a8-43da-11ed-b878-0242ac120002"
}
```
[View full API reference](/api-reference/onboarding/compliance/#operation/solaris_postbox_item_confirmations_create)
## Step 6: Complete the customer identification and due diligence process
In this step, create and trigger the Know Your Customer (KYC) process for your customer and make sure the customer completes the KYC and the customer due diligence (CDD) process successfully.
### 6.1 Customer identification
All customers must be successfully identified using a suitable KYC method to be onboarded for any of Solaris' products.
Solaris offers different identification methods based on the product, region, and customer type. For an overview of available KYC methods, check the [customer KYC products overview](/guides/kyc) page.
This guide explains the integration process using [Bankident](/guides/kyc/bankident). Other identification methods are possible; the Solaris team will recommend the most suitable KYC method for your banking use case.
#### 6.1.1 Create an identification
Create an identification resource for your customer by completing [Step 3](/guides/kyc/bankident/bankident-api-integration#step-3-create-person-identification) of the Bankident guide.
#### 6.1.2 Complete Bank account validation step
Prompt your customer to complete the bank account validation and payment initiation described in [Step 4](/guides/kyc/bankident/bankident-api-integration#step-4-validate-bank-account-and-issue-payment) of the Bankident guide.
#### 6.1.3 Download final contract (Revolving only)
After the customer validates their bank account, Solaris will generate the final credit card contract and upload it. You'll receive a `POSTBOX_ITEM_CREATED` webhook notification. Once you receive the webhook notification, complete the following steps:
1. Retrieve the documents the customer must sign during the QES process using **GET Index documents for a person identification**.
2. Download the files using **GET Download a document**.
3. Display the documents to the customer on your app before triggering the QES process.
[View GET Index documents for a person identification API reference](/api-reference/onboarding/persons/#tag/Person-documents/paths/~1v1~1persons~1%7Bperson_id%7D~1identifications~1%7Bid%7D~1documents/get)
[View GET Download a document API reference](/api-reference/onboarding/persons/#tag/Person-documents/paths/~1v1~1persons~1%7Bperson_id%7D~1documents~1%7Bid%7D~1file/get)
#### 6.1.4 Start QES process (Revolving only)
The customer must sign the credit card contract using a QES process **only** if they chose a **revolving** credit card.
Trigger the QES process for the customer by completing [Step 5](/guides/kyc/bankident/bankident-api-integration#step-5-sign-contracts-using-qualified-electronic-signature-qes) of the Bankident guide.
### 6.2 Customer due diligence
* In addition to the identification process, Solaris runs different risk screening and customer vetting checks (i.e., Customer Due Diligence process) on new and existing customers.
* The result of this process is stored in different properties in the `person` resource.
* The status of all the CDD-related properties must be `green` for the customer to be onboarded.
For more information, check the [Customer Due Diligence guide](/guides/kyc/cdd).
### 6.3 Screening for FATCA indicia
To comply with the [Foreign Account Tax Compliance Act (FATCA)](https://www.irs.gov/businesses/corporations/foreign-account-tax-compliance-act-fatca), Solaris is required to perform checks to determine whether the customer is subject to US tax law. These checks are in addition to the self-declaration during the Legal and Compliance screen.
To perform the FATCA checks, parse the `person` and `identification` resources using the following endpoints:
- [GET Retrieve person](/api-reference/onboarding/persons/#tag/Persons/paths/~1v1~1persons~1%7Bid%7D/get)
- [GET Retrieve person identification](/api-reference/identity/identifications/#tag/Person-identifications/paths/~1v1~1persons~1%7Bperson_id%7D~1identifications~1%7Bid%7D/get)
#### Hard criteria
To determine the customer's FATCA relevance, you must screen for the following **hard criteria**:
- Has the customer provided a US passport as their identification document? Check the `legitimation_country` attribute on the identification resource.
- Is the customer a citizen of the US? Check the `nationality` attribute.
- Has the customer provided a residential address in the US, the US Minor Outlying Islands, or the US Virgin Islands? Check the `country` attribute.
- Was the customer born in the US, the US Minor Outlying Islands, or the US Virgin Islands? Check the `birth_country` attribute.
**When to reject the customer**
If any of these hard criteria attributes have the value of `US` or `USA`, **you must deny banking services to the customer and stop the onboarding process**. Failure to screen for these hard FATCA criteria may cause ongoing operational burdens for Solaris customer support.
#### Soft criteria
To further determine the customer's FATCA relevance, screen for the following **soft criteria**:
- Has the customer provided a US mobile number? Check the `mobile_number` attribute. US mobile numbers have a country code of +1.
- Is the customer's only address a PO box or a c/o address? Check the `address_line_1` and `address_line_2` attributes.
**When to reject the customer**
- If the answer is "Yes" to any of the **soft criteria,** ask the customer to clarify their phone number and/or address.
- If the customer provides a non-US phone number and a physical address, you may onboard them.
- If the customer **does not** provide a non-US phone number and a physical address, you **may not onboard them.**
Failure to screen for soft FATCA criteria may cause ongoing operational burdens for Solaris customer support.
Important
Note that Solaris periodically checks FATCA relevance for existing customers. If a customer's FATCA relevance changes to `true`, Solaris's Customer Support team will provide further instructions.
You can only proceed to the next steps when:
* The identification status reaches `successful`.
* All screening and risk checks in the CDD process have a green status.
* The FATCA screening is completed to confirm the customer is not liable for taxes in the United States.
## Step 7: Finalize credit card application
After successful customer identification process, finalize the credit card application by calling the following endpoint:
### POST Finalize credit card application
Call this endpoint to finalize the credit card application. This API call triggers the creation of the credit card account by Solaris. The API response will return the account ID and IBAN and the application status changes to `FINALIZED`. Additionally, the billing cycle start and end date will be automatically calculated.
**Request URL**
```shell
POST /v1/credit_card_applications/{id}/finalize
```
[Click here to view the full API reference.](/api-reference/digital-banking/credit-cards/#tag/Credit-cards/paths/~1v1~1credit_card_applications~1%7Bid%7D~1finalize/post)
### Credit card account
The account ID and IBAN returned in the payload of the previous call is the account associated with the credit card to which the credit card limit will be attached.
- For business and freelancer credit cards, the business or the freelancer will be the account holder and the approved credit card limit will be attached to this account. Afterward, the business or freelancer can request credit cards for their employees and attach spending limits to the cards. In this case, the employee is only a cardholder who can access and use the funds allocated to them through the usage of their issued credit card.
- Please note that a credit card account is a restricted account. Check the [credit card usage](/guides/cards/credit-cards/#credit-card-usage) section to know about allowed transactions.
Check the [account management guide](/guides/digital-banking/account-management/) to find details about how to manage and service accounts.
## Step 8: Create reference account and set credit card limit
In this step, you must create a reference account for the customer. The reference account will be used as the account in the SDD mandate, from which Solaris will pull the SDD payments.
### Reference accounts API reference
Visit the following link to find all the endpoints related to the reference account resource, including related properties and examples.
- [Reference accounts resource API reference](/api-reference/digital-banking/account-management/#tag/Reference-accounts):
- [POST Create a reference account for a person](/api-reference/digital-banking/account-management/#tag/Reference-accounts/paths/~1v1~1persons~1%7Bperson_id%7D~1accounts~1%7Baccount_id%7D~1reference_accounts/post)
- [GET Index reference accounts for a person](/api-reference/digital-banking/account-management/#tag/Reference-accounts/paths/~1v1~1persons~1%7Bperson_id%7D~1accounts~1%7Baccount_id%7D~1reference_accounts/get)
#### POST Create reference account
After creating the SDD mandate, you must create a reference account resource for
the customer and link it to the internal account. You must add the customer's
`person_id` and `account_id` in the request URL. You must add the external
account details and the signed mandate information in the request body.
You must include the following properties in the request body:
- `name`: The customer's name on their external bank account.
- `iban`: The IBAN of the external bank account from which the SDD will be debited.
- `mandate_number`: The number of the SDD mandate the customer signed.
- `mandate_signature_date`: The date when the customer signed the SDD mandate.
**Request URL**
```json
// POST /v1/persons/{person_id}/accounts/{account_id}/reference_accounts
{
"name": "Max Mustermann",
"iban": "DE32110101001000000029",
"mandate_number": "SAMPAY7D226d32882d11Eb8DcD0242Ae2F4",
"mandate_signature_date": "2016-04-20"
}
```
The API call returns an object with a unique ID, which is the reference account ID. The `status` field refers to the reference account's status. Possible values are `ACTIVE` and `INACTIVE`.
[Click here to view the full API reference](/api-reference/digital-banking/account-management/#tag/Reference-accounts/paths/~1v1~1persons~1%7Bperson_id%7D~1accounts~1%7Baccount_id%7D~1reference_accounts/post).
After creating the reference account, you must attach the credit limit approved by Solaris to the credit card's account using the following endpoint.
You can set the credit card limit to the account as you see fit as long as it falls within or equals the limit approved by Solaris.
#### PATCH Attach credit limit to credit card account
**Request example**
```json
// PATCH /v1/credit_card_applications/{id}/limit
{
"limit": {
"value": 1000,
"unit": "cents",
"currency": "EUR"
}
}
```
The API call returns the details of the application and sets the `current_limit` to the limit defined by you. The limit will also be attached to the associated credit card account.
[Click here to view the full API reference.](/api-reference/digital-banking/credit-cards/#tag/Credit-cards/paths/~1v1~1credit_card_applications~1%7Bid%7D~1limit/patch)
## Step 9: Create and activate credit card
In this step, you must create and activate the credit card. The customer can choose between different card types, such as a physical or a virtual card, with the option to tokenize the card to be used in any e-wallet, such as Google Pay or Apple Pay.
### API reference
Visit the following link to find all the endpoints related to cards, including related properties and examples.
- [Cards API reference](/api-reference/digital-banking/cards/)
#### POST Create a card
This endpoint initiates the card creation process for the customer. Include the `account_id` along with the `person_id` in the request URL. Additionally, include the following properties in the request body:
- `line_1`: The cardholder's name which will be printed on the card. Pay attention to the special rules governing card names mentioned [here](/guides/cards/creation-and-servicing/#cardholder-name-and-address-generation).
- `type`: The card type. View [here](/guides/cards/creation-and-servicing/#appendix-i-card-types) a list of possible card types for each customer segment.
**Request URL:**
```shell
POST /v1/persons/{person_id}/accounts/{account_id}/cards
```
**Response example:**
A card will be created in the system, and Solaris will issue a card creation request with SIA. The API will respond with the ID of the card and the status of `PROCESSING`.
```json
{
"id": "8febdba4912a747808ccc6f95f82aaa4",
"status": "PROCESSING"
}
```
[Click here to view the full API reference.](/api-reference/digital-banking/cards/#tag/Cards-servicing/paths/~1v1~1persons~1%7Bperson_id%7D~1accounts~1%7Baccount_id%7D~1cards/post)
#### GET Retrieve card details
Before you can activate the card, make the following API call to retrieve the details of the card. The `status` must have the value of `INACTIVE`. The status change may take a few seconds after the initial `POST Create card` request, as Solaris submits card creation requests asynchronously to SIA.
The API will respond with the card details when the `status` changes to `INACTIVE`. Until then, the response will look the same as the one from the previous call.
**Request URL:**
```shell
GET /v1/cards/{card_id}
```
[Click here to view the full API reference.](/api-reference/digital-banking/cards/#tag/Cards-servicing/paths/~1v1~1cards~1%7Bid%7D/get)
#### POST Activate a card
Once the card is `INACTIVE` and you have retrieved the details using the previous API call, you can activate the card using the following endpoint:
**Request URL:**
```shell
POST /v1/cards/{card_id}/activate
```
[Click here to view the full API reference.](/api-reference/digital-banking/cards/#tag/Cards-servicing/paths/~1v1~1cards~1%7Bcard_account_id%7D~1activate/post)
### Cards servicing
For more information about cards servicing, check the [Card creation and servicing guide](/guides/cards/creation-and-servicing/).
### Card push provisioning
If your customer wants to use their card in a digital wallet, such as Google Pay, Apple Pay, or Samsung Pay wallet, implement the relevant endpoints in the [Card Push Provisioning guide](/guides/cards/push-provisioning).
See the [Cards overview page](/guides/cards) for more information about cards.
## Step 10: Servicing credit cards
In this section, you can find endpoints related to servicing credit cards.
### PATCH Update repayment option
Your customer can change the repayment option after initial onboarding (e.g., switching from charge to revolving and vice versa).
The requested repayment option will be effective from the next billing cycle.
You can update the repayment option by calling the following endpoint:
**Request example**
```json
// PATCH /v1/credit_card_applications/{id}
{
"repayment_options": {
"upcoming_type": "PARTIAL",
"minimum_amount": {
"value": 100,
"unit": "cents",
"currency": "EUR"
},
"minimum_percentage": 3
},
"statement_with_details": true
}
```
[Click here to view the full API reference.](/api-reference/digital-banking/credit-cards/#tag/Credit-cards/paths/~1v1~1credit_card_applications~1%7Bid%7D/patch)
### GET Index a credit card bill
Call this endpoint to retrieve a credit card bill.
Please note that Solaris generates credit cards statements and uploads them to Postbox. You can use this endpoint if you want to generate your own bills.
**Request URL**
```shell
GET /v1/credit_card_bills/{bill_id}
```
[Click here to view the full API reference.](/api-reference/digital-banking/credit-cards/#tag/Credit-cards/paths/~1v1~1credit_card_bills~1%7Bbill_id%7D/get)
## Step 11: Terminating credit cards
This section describes how credit card termination works and how to use the related API endpoints.
### Credit card termination process
Here is a summary of the termination process:
1. Either you, the customer (via your frontend), or Solaris initiates the termination.
- If **Solaris** initiated the termination, then you will receive a notification on the [CREDIT_CARD_APPLICATION_TERMINATION webhook event](/api-reference/onboarding/webhooks/webhook-events/paths/credit_card_application_termination/post) and you must immediately notify the customer about the termination.
- If the **customer** initiated the termination, then your application must call the [POST Terminate a credit card application](/api-reference/digital-banking/credit-cards/#tag/Termination-requests/paths/~1v1~1credit_card_applications~1%7Bapplication_id%7D~1termination_requests/post) endpoint. This will create a **credit card application termination** resource.
2. Solaris' system will trigger a termination and calculate a **legal closure date** for the credit card.
- If the credit card has a **negative** balance, then Solaris will generate a final bill and trigger a SEPA Direct Debit (SDD) from the customer's reference account.
- If the credit card has a **positive** balance, then Solaris will initiate a payout to the attached reference account.
3. You will receive notifications on the [CREDIT_CARD_APPLICATION_TERMINATION webhook event](/api-reference/onboarding/webhooks/webhook-events/paths/credit_card_application_termination/post) when the status of the credit card application termination changes. If the termination succeeds, the credit card will be closed. If it fails, then Solaris Customer Support will provide assistance.
#### Pre-termination checks
Solaris will check for the following criteria before terminating a credit card:
- The credit card is in **dunning.**
- The credit card has `CARD_TRANSACTION` or `CARD_DIRECT_DEBIT` bookings from the past 45 days.
- The credit card has **reservations** with the status OPEN.
- The credit card has bookings with a valuta date in the future.
- The last SDD was triggered less than 56 days ago.
If any of these criteria are met, then the **technical closure** of the credit card may be delayed.
### POST Terminate a credit card application
This endpoint initiates a termination request for an existing credit card.
Termination requests can be revoked within **5 business days** of their
initiation. After that, the termination can not be reversed. See the endpoint
below for instructions on how to revoke a termination request.
**Request URL:**
```shell
POST /v1/credit_card_applications/{application_id}/terminate
```
**Required properties:**
- `reason`: The reason for terminating the credit card.
[Click here to view the full documentation.](/api-reference/digital-banking/credit-cards/#tag/Termination-requests/paths/~1v1~1credit_card_applications~1%7Bapplication_id%7D~1termination_requests/post)
### POST Revoke a termination request
This endpoint revokes a request to terminate a credit card.
**Request URL:**
```shell
POST /v1/credit_card_terminations/{id}/revoke
```
[Click here to view the full documentation.](/api-reference/digital-banking/credit-cards/#tag/Termination-requests/paths/~1v1~1credit_card_terminations~1%7Bid%7D~1revoke/post)
## What's next?
Congratulations! You've successfully integrated the Solaris Credit Cards product.
Check the following appendices section for additional information on enums and testing data.
### Useful resources
Check the following links for additional related guides and API reference documentation:
* [Credit cards API reference documentation](/api-reference/digital-banking/credit-cards/#tag/Credit-cards)
* [Reference accounts API reference documentation](/api-reference/digital-banking/account-management/#tag/Reference-accounts)
* [Bankident Identification](/guides/kyc/bankident)
* [Account management guide](/guides/digital-banking/account-management)
* [Card creation & servicing guide](/guides/cards/creation-and-servicing)
* [SEPA Transfers Overview](/guides/digital-banking/sepa-transfers)
* [SEPA Direct Debit Transfers](/guides/digital-banking/sepa-transfers/sepa-direct-debit-transfer)
## Appendix I: Enums
### Credit card application status
The following table includes the enums for the field `status` and their descriptions in the credit card application resource. For example, it's available when you call the GET Retrieve credit card application.
| Status | Description | Actions |
| --- | --- | --- |
| `PENDING` | The credit card application has been created for the customer and is currently being validated. | Wait for the scorer's result. |
| `IN_SCORING` | The application has passed the initial validation checks. The scorer has been triggered and the application is currently under credit scoring. | Wait for the scorer's result. |
| `PRE_APPROVED` | The scorer approved the credit card application. | Trigger the identification flow for the customer. Download the SECCI form and credit card contract. Get the customer's consent on the SECCI and contract and upload signed documents. |
| `FINALIZED` | The customer identification is successful and the credit card application has been finalized. | Set the credit card limit on the account. Set up the reference account. |
| `DECLINED` | The scorer has rejected the application and/or identification has failed, and the credit card application is rejected. | Notify the customer and abort the onboarding process. |
### Document types
The following table includes the possible values for the field `document_type` and their descriptions.
| Enum | Description |
| --- | --- |
| `ANNUAL_FINANCIAL_STATEMENT` | A business or company's annual financial statement. |
| `KYC_REPORT` | The KYC report generated after successful customer identification. |
| `ID_DOCUMENT` | A person's identification document, such as a passport or ID card. |
| `SIGNATURE` | A signature sample. |
| `PICTURE` | A picture or scanned document of any other type. |
| `QES_DOCUMENT` | A document related to a Qualified Electronic Signature (QES). |
| `SIGNED_CONTRACT` | A signed contract of any kind. |
| `SIGNED_QES_DOCUMENT` | A document signed by a Qualified Electronic Signature (QES). |
| `REGISTER_APPLICATION` | A document proving the application for registration (Gründungsurkunde), used for companies "in formation". |
| `REGISTER_CHECK` | A register check. |
| `REGISTER_EXTRACT` | A commercial register excerpt or similar document. |
| `FOUNDATION_DOCUMENT` | The foundation document of a company or business. |
| `SCHUFA_COMPACT_REPORT` | A compact SCHUFA report. |
| `SCHUFA_GWG_REPORT` | A GWG (Money Laundering Act) SCHUFA report. |
| `SCHUFA_FULL_REPORT` | A full SCHUFA report about a person. |
| `SCHUFA_SHORT_REPORT` | A short SCHUFA report about a person. |
| `CREDIT_AGENCY_REPORT` | A report issued by a credit agency. |
| `SHARE_HOLDERS_AGREEMENT` | A shareholder agreement. |
| `SHAREHOLDERS_LIST` | A list of shareholders. |
| `TRADING_LICENSE` | A trading license. |
| `TRANSPARENCY_REGISTER_EXTRACT` | An extract from the transparency register. |
| `INVOICE` | An invoice of any kind. |
| `OTHER` | Any other type of document. |
| `VIDEO` | A video of any kind. |
| `VAT_CERTIFICATE` | VAT registration certificate. |
## Appendix II: Bankident flow
### Bankident testing data
### Test scenarios
Your solution must consider the following edge cases for Bankident:
- The user data was not found.
- The user's IBAN could not be matched to the provided name.
- The account provided is a JOINT account (i.e., shared account).
- An authorized person on the account (i.e., someone who does not own the account) attempts to identify.
- Timeout of 10 minutes between payment initiation and finalization of QES.
You can test edge cases with the following mocked IBANs:
| IBAN | Mocked behavior | Error code |
| --- | --- | --- |
| DE11110101010100000020 | Success from service provider & Swisscom | |
| DE43110101010000000010 | Success—Access by authorized holder | |
| DE22110101010100000016 | User data not found in service provider DB | HTTP 412, `MATCH_FOR_PERSON_DATA_NOT_FOUND` |
| DE33110101010100000012 | User without QBit | HTTP 412, `PREVIOUS_IDENT_NOT_FOUND` |
| DE44110101010100000008 | Account check failed on Schufa | HTTP 412, `PERSON_ACCOUNT_MATCH_NOT_FOUND` |
| DE55110101010100000004 | Account was JOINT | HTTP 409, expectation_mismatch |
| DE66110101010100000000 | Account snapshot failed | HTTP 409, expectation_mismatch |
| DE77110101010100000093 | Success from service provider and unsuccessful in Swisscom | |
| DE77110101010100000093 | Every subsequent Authorize QES SMS TAN will invalidate the previous TAN | |
### Happy path test scenario
Complete the following steps to simulate a successful identification workflow with Bankident on Sandbox.
#### 1. Create a person
Create a `person` [resource](/api-reference/onboarding/persons/#tag/Persons/paths/~1v1~1persons/post) using the following endpoint and add the following fields in the request body.
**Request**
```json
POST /v1/persons
{
"salutation": "MR",
"first_name": "Leander",
"last_name": "Zierfisch",
"address": {
"line_1": "BERLINER STR. 45",
"line_2": "",
"postal_code": "14169",
"city": "Berlin",
"country": "DE"
},
"birth_date": "1978-07-15",
"birth_city": "Aachen",
"birth_country": "DE",
"nationality": "DE",
"email": "person@example.com",
"employment_status": "EMPLOYED",
"fatca_relevant": "false",
"fatca_crs_confirmed_at": "2019-01-01T00:00:00Z",
"terms_conditions_signed_at": "2019-01-01T00:00:00Z",
"own_economic_interest_signed_at": "2019-01-01T00:00:00Z"
}
```
#### 2. Create and verify a mobile number
You can follow the same steps mentioned in the guide and use the static values.
#### 3. Create an identification
Create an identification [resource](/api-reference/identity/identifications/#tag/Person-identifications/paths/~1v1~1persons~1%7Bperson_id%7D~1identifications/post) and specify the identification `method` as `bank` in the request body of the following endpoint. Add the `person_id` returned from the previous API call to the request URL. Additionally, include the `iban` for a successful identification
**Request example**
```json
POST /v1/persons/{person_id}/identifications
{
"method": "bank",
"iban": "DE11110101010100000020",
"terms_and_conditions_signed_at": "2020-07-07T11:36:29.000Z"
}
```
#### 4. Trigger the identification
To trigger the identification flow, call the following endpoint and add the `person_id` and the identification `id` returned from the previous API calls to the request URL.
**Request example**
```json
PATCH /v1/persons/{person_id}/identifications/{id}/request
```
**Response**
```json
{
"id": "a7a57dadfcc83117b5c3b72f4113be25cidt",
"reference": null,
"url": "https://fts-payment-initiation-wizard.solaris-sandbox.de/index.html?wizard_session_key=bfo5r16AMLlt6ZEX9Oh3JUWIkTelorupBwzIlJRR&interface_id=da05",
"status": "pending",
"completed_at": null,
"method": "bank",
"proof_of_address_type": null,
"proof_of_address_issued_at": null,
"iban": "DE11110101010100000020",
"terms_and_conditions_signed_at": "2020-07-07T11:36:29.000Z",
"authorization_expires_at": null,
"confirmation_expires_at": null,
"estimated_waiting_time": null
}
```
#### 5. Complete the payment transfer step
Go to the URL returned in the previous call and enter any number for the account number and the banking PIN and click `NEXT`. This screen simulates a login screen, in which the customer must log into their online banking and authorize a 5-cent transfer to validate the account ownership.
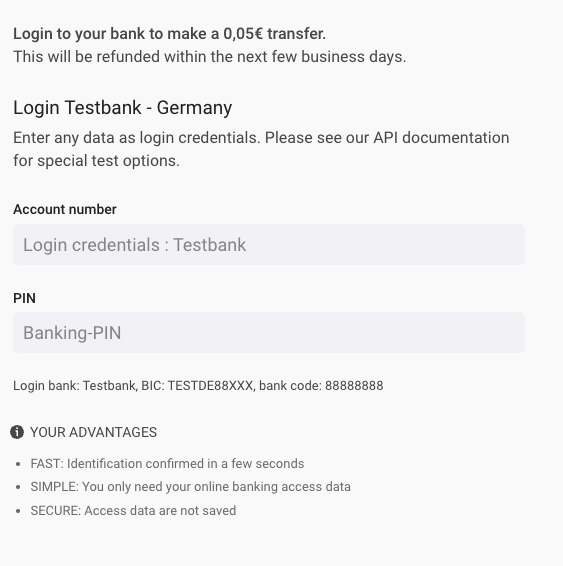
After clicking `NEXT`, another screen will pop up and you have to enter any TAN number to authorize the transaction. This screen simulates the screen in which the customer must enter the SMS OTP they received on their verified mobile number to authorize the transaction.

#### 6. Complete the QES step
After successful payment transfer, complete the QES process by doing the following steps:
1. Call [PATCH Start e-signing process](/api-reference/identity/identifications/#tag/Person-identifications/paths/~1v1~1persons~1%7Bperson_id%7D~1identifications~1%7Bid%7D~1authorize/patch). Add the `person_id` and identification `id` in the request URL.
**Request**
```shell
PATCH /v1/persons/{person_id}/identifications/{id}/authorize
```
**Response**
```json
{
"id": "a7a57dadfcc83117b5c3b72f4113be25cidt",
"reference": null,
"url": "https://fts-payment-initiation-wizard.solaris-sandbox.de/index.html?wizard_session_key=bfo5r16AMLlt6ZEX9Oh3JUWIkTelorupBwzIlJRR&interface_id=da05",
"status": "confirmation_required",
"completed_at": null,
"method": "bank",
"proof_of_address_type": null,
"proof_of_address_issued_at": null,
"iban": "DE11110101010100000020",
"terms_and_conditions_signed_at": "2020-07-07T11:36:29.000Z",
"authorization_expires_at": "2022-08-11T08:38:21.000Z",
"confirmation_expires_at": "2022-08-11T08:37:23.000Z",
"current_reference_token": "1234-5678",
"estimated_waiting_time": null
}
```
1. Call [PATCH Confirm e-signing process](/api-reference/identity/identifications/#tag/Person-identifications/paths/~1v1~1persons~1%7Bperson_id%7D~1identifications~1%7Bid%7D~1confirm/patch). Add the `person_id` and identification `id` in the request URL.
**Request**
```shell
PATCH /v1/persons/{person_id}/identifications/{id}/confirm
```
**Response**
```json
{
"id": "a7a57dadfcc83117b5c3b72f4113be25cidt",
"reference": null,
"url": "https://fts-payment-initiation-wizard.solaris-sandbox.de/index.html?wizard_session_key=bfo5r16AMLlt6ZEX9Oh3JUWIkTelorupBwzIlJRR&interface_id=da05",
"status": "confirmed",
"completed_at": null,
"method": "bank",
"proof_of_address_type": null,
"proof_of_address_issued_at": null,
"iban": "DE11110101010100000020",
"terms_and_conditions_signed_at": "2020-07-07T11:36:29.000Z",
"authorization_expires_at": "2022-08-11T08:38:21.000Z",
"confirmation_expires_at": "2022-08-11T08:37:23.000Z",
"current_reference_token": "1234-5678"
}
```
1. Afterward, call [GET Retrieve a person identification](/api-reference/identity/identifications/#tag/Person-identifications/paths/~1v1~1persons~1%7Bperson_id%7D~1identifications~1%7Bid%7D/get) and the response should include a `successful` status and the signed documents with their IDs.
**Request**
```shell
GET /v1/persons/{person_id}/identifications/{id}
```
**Response**
```json
{
"id": "a7a57dadfcc83117b5c3b72f4113be25cidt",
"reference": null,
"url": "https://fts-payment-initiation-wizard.solaris-sandbox.de/index.html?wizard_session_key=bfo5r16AMLlt6ZEX9Oh3JUWIkTelorupBwzIlJRR&interface_id=da05",
"status": "successful",
"completed_at": "2022-08-11T08:29:43.000Z",
"method": "bank",
"proof_of_address_type": null,
"proof_of_address_issued_at": null,
"address": null,
"documents": [
{
"id": "a6585ea2b053a69fb705a0eb963084cfcdoc",
"name": "a7a57dadfcc83117b5c3b72f4113be25cidt_prepared_for_signing_kyc_report.pdf",
"content_type": "application/pdf",
"document_type": "QES_DOCUMENT",
"size": 88139,
"customer_accessible": false,
"created_at": "2022-08-11T08:25:11.000Z"
},
{
"id": "4d1aa91e091e375e30e94de4ab1cf0f4cdoc",
"name": "SIGNED_a7a57dadfcc83117b5c3b72f4113be25cidt_prepared_for_signing_kyc_report.pdf",
"content_type": "application/pdf",
"document_type": "SIGNED_QES_DOCUMENT",
"size": 88139,
"customer_accessible": false,
"created_at": "2022-08-11T08:29:43.000Z"
}
],
"iban": "DE11110101010100000020",
"terms_and_conditions_signed_at": "2020-07-07T11:36:29.000Z",
"authorization_expires_at": "2022-08-11T08:38:21.000Z",
"confirmation_expires_at": "2022-08-11T08:37:23.000Z",
"current_reference_token": "1234-5678"
}
```
### Bankident rejection reasons and error codes
The following table includes the possible failure reasons for Bankident. These failure reasons are also relevant for the Bankident+ method.
| HTTP status | Error code | Description | UI user error message | Actions |
| --- | --- | --- | --- | --- |
| 412 | `IBAN_USAGE_LIMIT_EXCEEDED` | The provided IBAN has been blacklisted due to reaching the limit of failed attempts. | **DE:** Sie haben das Limit an Versuchen erreicht. Bitte fahren sie mit der Video-Identifizierung fort.**EN:** You have reached the limit of attempts. Please continue with video identification. | Potential fraud attempt; onboarding should stop. Show a generic message to the customer. |
| 412 | `MOBILE_NUMBER_NOT_VERIFIED` | The customer does not have a verified mobile number. | | Verify the mobile number and retry the call. |
| 412 | `IDENTIFICATION_ATTEMPTS_EXCEEDED` | The mobile number or the combination of `first_name` and `last_name` reached the limit of failed attempts. | **DE:** Diese Identifikationsmethode steht nicht zur Verfügung. Bitte fahren sie mit der Video-Identifizierung fort.**EN:** This identification method is not available. Please continue with video identification. | Potential fraud attempt; onboarding should stop. Show a generic message to the customer. |
| 422 | `ALREADY_IDENTIFIED_SUCCESSFULLY` | The customer has been successfully identified. | **DE:** Sie haben sich bereits erfolgreich identifizert.**EN:** You have already successfully identified yourself. | Stop onboarding. Ask the customer to use their existing account. |
| 412 | `MATCH_FOR_PERSON_DATA_NOT_FOUND` | The customer's record could not be found in SCHUFA. This usually happens to customers who recently moved to Germany. | **DE:** Diese Identifikationsmethode steht nicht zur Verfügung. Bitte fahren sie mit der Video-Identifizierung fort.**EN:** This identification method is not available. Please continue with video identification. | No action needed. |
| 412 | `PERSON_ACCOUNT_MATCH_NOT_FOUND` | We could not establish a connection between the customer and the provided IBAN. | **DE:** Für diese IBAN steht diese Identifikationsmethode nicht zur Verfügung. Bitte versuchen Sie es mit einer anderen IBAN oder fahren Sie mit Video-Identifizierung fort.**EN:** This identification method is not available for this IBAN. Please try another IBAN or continue with video identification. | The customer can try again with a different IBAN. |
| 412 | `PREVIOUS_IDENT_NOT_FOUND` | The customer did not meet the identification preconditions. | **DE:** Diese Identifikationsmethode steht nicht zur Verfügung. Bitte fahren sie mit der Video-Identifizierung fort.**EN:** This identification method is not available. Please continue with video identification. | The customer cannot be onboarded with this identification method. |
| 412 | `PERSON_MISSING_REQUIRED_DATA` | The customer is missing some of the required data. | **DE:** Ein Fehler ist aufgetreten. Bitte kontaktieren Sie den Support.**EN:** An error has occurred. Please contact Solaris support. | Ask the customer to enter the missing data and retry the call. |
| 412 | `DEPENDENCY_ERROR` | External provider service failure. | **DE:** Ein Fehler ist aufgetreten. Bitte kontaktieren Sie den Support.**EN:** An error has occurred. Please contact Solaris support. | Contact Solaris. |
| 412 | `INVALID_MODEL` | Technical error. | **DE:** Ein Fehler ist aufgetreten. Bitte kontaktieren Sie den Support.**EN:** An error has occurred. Please contact support. | Check the request JSON body and retry the call. Contact Solaris if the issue is not solved. |
| 412 | `INTERNAL_REQUEST_ERROR` | Technical error. | **DE:** Ein Fehler ist aufgetreten. Bitte kontaktieren Sie den Support.**EN:** An error has occurred. Please contact Solaris support. | Contact Solaris. |
| 412 | `GENERIC_ERROR` | Technical error. | **DE:** Ein Fehler ist aufgetreten. Bitte kontaktieren Sie den Support.**EN:** An error has occurred. Please contact Solaris support. | Contact Solaris. |
| 412 | `ACCESS_BY_AUTHORIZED_HOLDER` | The customer is not the account holder but an authorized person on the account. This is not allowed for fraud protection reasons. | **DE:** Sie sind nicht Kontoinhaber. Bitte nutzen sie eine andere IBAN oder fahren Sie mit der Video-Identifizierung fort.**EN:** You are not the account holder. Please use another IBAN or continue with video identification. | The customer can try again with a bank account of which they are the account holder. |
| 412 | `EXPIRED` | The identification has expired (happens after 30 days). | **DE:** Ihr Identifizierungsprozess ist abgelaufen. Bitte versuchen Sie es erneut.**EN:** Your identification attempt has expired. Please try again. | A new identification must be created for the customer to restart the process. |
| 412 | `ACCOUNT_SNAPSHOT_FAILED` | The payment initiation (5-cent transfer) failed. This step is done by an external provider; failure could have various reasons. | **DE:** Die Bankanmeldung oder Überweisung ist fehlgeschlagen. Bitte versuchen Sie es erneut.**EN:** The bank login or transfer has failed. Please try again. | The customer can try again with a different IBAN. |
| 412 | `JOINT_ACCOUNT` | The provided account is a joint account. This is not allowed for fraud protection reasons. | **DE:** Gemeinschaftskonten sind nicht unterstützt. Bitte nutzen sie eine andere IBAN oder fahren Sie mit der Video-Identifizierung fort.**EN:** Joint accounts are not supported. Please use a different IBAN or continue with video identification. | The customer must use an account solely owned by them. |
| 412 | `ACCOUNT_SNAPSHOT_EXPIRED` | The payment initiation expired (10-minute limit). | **DE:** Die Anmeldesitzung der Bank ist abgelaufen. Bitte versuchen Sie es erneut.**EN:** The bank login session has expired. Please try again. | The customer did not confirm the 5-cent transfer within the dedicated 10-minute time frame. They must restart the process. |
### Bankident FAQs
The following are common questions and answers related to the integration process of Bankident solution. If you have other questions or use cases not mentioned in this guide, contact your Partner Manager for support.
### General
**How many identification attempts can a user make?**
A single `person` resource can make a maximum of **20 attempts** before receiving a generic error message.
**Can I reuse a successful identification for different companies?**
There are no technical restrictions on reusing an identification. However, you must define **GDPR** measures regarding data cleanup and consent reuse.
### Eligibility & Data
**Are non-German IBANs supported?**
No. Bankident currently supports only **German** IBANs. If your customer does not have a German IBAN, consider using [VideoIdent](/guides/kyc/videoident) or [Fourthline](/guides/kyc/fourthline).
**Which mobile country codes are supported?**
Solaris supports all mobile country codes **except**:
* Iran (+98)
* North Korea (+850)
**Are international addresses supported?**
Yes, addresses from **any country** are accepted. However, identification success rates are significantly lower for addresses outside Germany. SCHUFA primarily stores data for German residents, so matching an international address is less likely to succeed.
### Timeouts & Validity
**How long is the SMS token valid?**
The SMS OTP for the Qualified Electronic Signature (QES) process is valid for **10 minutes**.
**What is the timeout for the bank connection widget?**
The session times out **10 minutes** after the customer **initiates the payment**. The timer tracks the window between the payment (cent transfer) and the final signature; it does not include the time spent on data entry.